
เวลาเราออกแบบระบบปรับอากาศ หรือที่เรียกกันว่า HVAC สิ่งสำคัญคือการจำลองการทำงานของระบบควบคุมอุณหภูมิอัตโนมัติ (Thermostat) ให้เหมือนจริงที่สุด บทความนี้จะแสดงวิธีใช้ความสามารถด้าน Scripting (การเขียนชุดคำสั่ง) ของโปรแกรม scFLOW เพื่อสร้างระบบควบคุมอุณหภูมิแบบง่ายๆ ที่สามารถปรับอุณหภูมิของลมที่จ่ายออกมาตามค่าที่วัดได้จากจุดตรวจวัดในห้อง
การนำระบบอัตโนมัติที่ทำงานตามตรรกะ (logic-based) มาใส่ในแบบจำลอง CFD (การจำลองพลศาสตร์ของไหลด้วยคอมพิวเตอร์) จะช่วยให้คุณสร้างการจำลองระบบ HVAC ที่สมจริงและมีประสิทธิภาพมากขึ้นได้
Table of Contents
🎯เป้าหมาย (Objective)
เราต้องการจำลองสถานการณ์ที่อุณหภูมิของลมที่เป่าเข้าห้องถูกปรับโดยอัตโนมัติ เพื่อรักษาอุณหภูมิเป้าหมาย ณ จุดที่กำหนดไว้ในห้อง ซึ่งก็คือการทำงานเลียนแบบ Thermostat ในชีวิตจริง ที่คอยควบคุมการทำงานของแอร์เพื่อให้เรารู้สึกสบาย
🛠️ เงื่อนไขการจำลอง (Simulation Conditions)
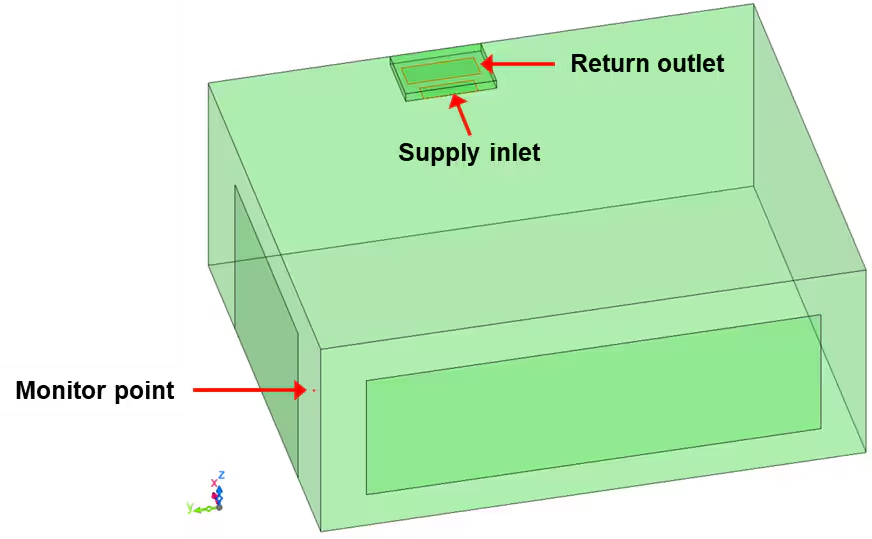
เราจะจำลองการไหลของอากาศในห้องหนึ่ง โดยกำหนดเงื่อนไขต่างๆ ดังนี้:
- ขนาดห้อง: 5.0 × 6.0 × 2.4 เมตร
- อุณหภูมิเริ่มต้นของห้องและลมที่จ่าย: 20.0°C
- เงื่อนไขที่หน้าต่าง:
- อุณหภูมิคงที่: 36.0°C
- ค่าสัมประสิทธิ์การถ่ายเทความร้อน (Heat transfer coefficient): 20 W/(m²·K)
- อัตราการไหลของลมที่จ่ายเข้าและลมที่ไหลกลับ: 9.5 m³/min
- จุดติดตั้ง Thermostat: (0.5, 5.95, 1.5) เมตร
- ตรรกะการทำความเย็น (Cooling Logic):
- ถ้าอุณหภูมิที่จุดตรวจวัด > 21°C → ปรับลมที่จ่ายเป็น 10°C
- ถ้าอุณหภูมิ < 20°C → ปรับลมที่จ่ายเป็น 20°C
🧩 ขั้นตอนการตั้งค่าใน scFLOW
1. เปิดไฟล์โมเดลตั้งต้น (Open Base Model)
เริ่มต้นด้วยไฟล์ room.pph ที่มีให้ใน scFLOW และตรวจสอบว่ามีชิ้นส่วนต่างๆ เหล่านี้อยู่:
- ชิ้นส่วนแผ่นบางๆ ที่ชื่อว่า
[Supply],[Return],[Window_x],[Window_y] - จุดสำหรับตรวจวัดที่ชื่อว่า
[Point_1] - มีการตั้งค่าการจำลองแบบแปรผันตามเวลา (transient settings) ไว้ล่วงหน้า: 2400 steps, 0.5s time step
2. กำหนดอุณหภูมิลมจ่ายผ่านสคริปต์ (Define Supply Temperature via Formatted Script)
- ไปที่หน้าจอ Flow Boundary ใน Condition Wizard
- ดับเบิลคลิกที่เงื่อนไข
[Flux]บนพื้นผิว[Supply] - ในช่อง
[Inflow Temperature]ให้เลือก Formatted Script
Code: ฟังก์ชันการตั้งค่า [usr_bcflowval]
var line = [];
var msg, tmp;

// Read thermostat coordinates from input
usf_getline(line, 200);
tmp = line[0].split(' ');
xyz_pt[0] = parseFloat(tmp[0]);
xyz_pt[1] = parseFloat(tmp[1]);
xyz_pt[2] = parseFloat(tmp[2]);
usf_sout("===== Thermostat point: " + xyz_pt);

// Read standard and cooling temperatures
usf_getline(line, 200);
tmp = line[0].split(' ');
T_standard = parseFloat(tmp[0]);
T_cool = parseFloat(tmp[1]);
usf_sout("===== Standard and cooling temperatures: " + T_standard + ", " + T_cool);

// Read thresholds for turning cooling on/off
usf_getline(line, 200);
tmp = line[0].split(' ');
T_turn_on = parseFloat(tmp[0]);
T_turn_off = parseFloat(tmp[1]);
usf_sout("===== Cooling ON/OFF thresholds: " + T_turn_on + ", " + T_turn_off);
คำอธิบาย: โค้ดส่วนนี้จะอ่านค่าพารามิเตอร์ต่างๆ สำหรับควบคุม Thermostat จากไฟล์ข้อมูล เช่น พิกัดของจุดตรวจวัด และระดับอุณหภูมิที่กำหนด แล้วนำไปเก็บไว้ในตัวแปรแบบ Global
3. ตั้งชื่อฟังก์ชันและค่าที่ส่งกลับ (Set Function Name and Return Value)
- ในช่อง
[Function Name]เลือก use_bcflowval - ตั้งค่าการส่งกลับเป็น:
return T_in;
return T_in;
คำอธิบาย: ส่วนนี้จะส่งค่าอุณหภูมิของลมจ่าย (T_in) ที่ถูกอัปเดตตลอดเวลาตามตรรกะที่เราเขียนไว้กลับไปให้โปรแกรม
กำหนดตัวแปร Global ในหน้าต่างสคริปต์ (Define Global Variables in Script Panel)
var xyz_pt = [];       // Coordinates of monitor point
var ie_pt = [];        // Element index containing the monitor point
var T_pt;              // Temperature at monitor point
var T_standard, T_cool; // Standard and cooled air temperatures
var T_turn_on, T_turn_off; // Thresholds for switching cooling on/off
var T_in;              // Final input temperature to be used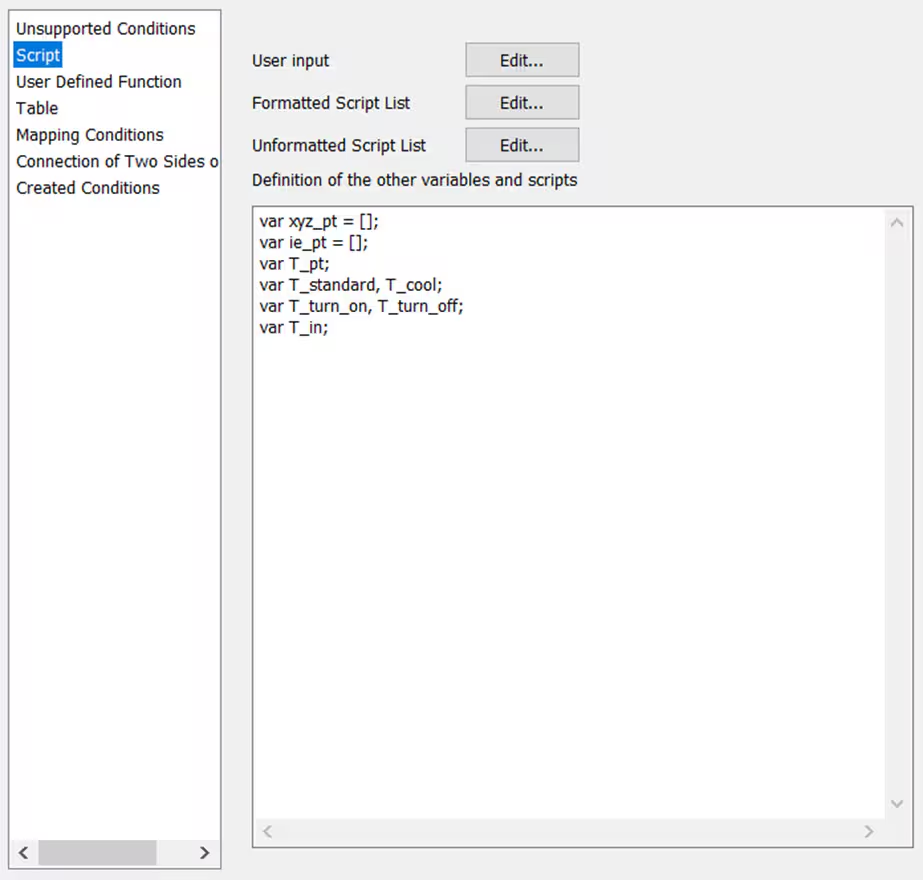
คำอธิบาย: ตัวแปรเหล่านี้จะถูกใช้ร่วมกันในฟังก์ชันต่างๆ เพื่อเก็บค่าและสถานะของตรรกะการทำงานของ Thermostat
5. ตั้งค่าฟังก์ชัน [usu_init]
var rank_pt = [];
usf_find_xyz_ie(xyz_pt, ie_pt, rank_pt);
if(rank_pt[0] == -1){
  usf_stop("===== Error: Thermostat point not found in domain");
}
คำอธิบาย: ฟังก์ชันนี้จะทำงานแค่ครั้งเดียวตอนเริ่มการจำลอง เพื่อค้นหาว่าจุดตรวจวัดของเราอยู่ในส่วนไหนของโมเดล ถ้าหาไม่เจอ โปรแกรมจะหยุดทำงานทันที
6. ตั้งค่าตรรกะใน [usu_cycle_start]
var tmp_T = [];
var ncycle;

tmp_T[0] = -999;
if(ie_pt[0] >= 0){
  usf_get_elem_fdata(ie_pt[0], $IVAR_TEMP, tmp_T); // Get temperature
}
T_pt = mpi_max(tmp_T[0]); // Assign temp using parallel-safe max value
usf_sout("===== Temperature at monitor point: " + T_pt);

ncycle = usf_ncyc();
if(ncycle == 1){
  T_in = T_standard; // Set to default on first step
}else if(T_pt > T_turn_on){
  T_in = T_cool;
}else if(T_pt < T_turn_off){
  T_in = T_standard;
}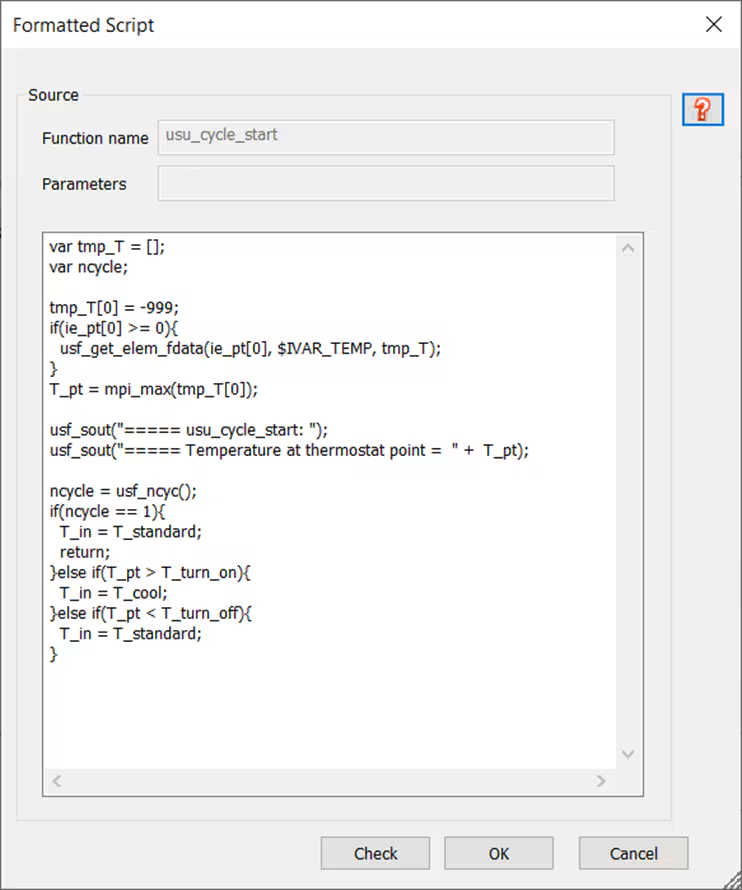
คำอธิบาย: โค้ดส่วนนี้จะทำงานซ้ำๆ ในทุกรอบของการจำลอง โดยจะไปดึงค่าอุณหภูมิล่าสุดจากจุดตรวจวัด แล้วใช้ตรรกะที่เราตั้งไว้เพื่อเลือกว่าจะจ่ายลมที่อุณหภูมิปกติ (T_standard) หรือลมเย็น (T_cool)
✅ ขั้นตอนสุดท้าย (Final Steps)
- ตรวจสอบการตั้งค่าสคริปต์ทั้งหมดอีกครั้งที่
[Script List] - กด Apply และ Save การเปลี่ยนแปลงทั้งหมด
- เริ่มการคำนวณ (Run the transient solver)
- เมื่อคำนวณเสร็จแล้ว ให้เปิดดูผลลัพธ์ใน L-File Viewer เพื่อตรวจสอบว่า Thermostat ของเราทำงานถูกต้องหรือไม่ โดยดูจาก:
- กราฟอุณหภูมิที่จุดตรวจวัด
[Point_1] - กราฟอุณหภูมิเฉลี่ยของลมที่จ่ายออกมาจาก
[Supply]
- กราฟอุณหภูมิที่จุดตรวจวัด
💡 Summary
ด้วยโค้ดเพียงไม่กี่บรรทัด scFLOW ก็สามารถทำให้เราจำลองตรรกะการทำงานของ Thermostat ในระบบ HVAC ได้อย่างทรงพลัง ระบบควบคุมนี้ช่วยเพิ่มความสมจริงให้กับการจำลอง และช่วยให้เราสามารถทดสอบสถานการณ์ต่างๆ สำหรับการใช้งานในอาคารอัจฉริยะ (smart building) ได้ ไม่ว่าคุณจะออกแบบเพื่อความสบายหรือเพื่อการประหยัดพลังงาน เทคนิคนี้จะช่วยเพิ่มความยืดหยุ่นและระบบอัตโนมัติให้กับกระบวนการจำลองของคุณ
🔗 แหล่งอ้างอิง (References)
- Hexagon SimCompanion. “scFLOW Script Sample for Thermostatic Control of Air Supply.” Accessed June 6, 2025. https://simcompanion.hexagon.com/customers/s/article/scFLOW-script-sample-for-thermostatic-control-of-air-supply